Wednesday, March 30, 2016

Project Update: And Then There Were Four

Completing one of the Roubo-style workbench leg tenon cuts really motivated me to get the remaining three behind me. So I did.

First, there were two.


Then, there were three.


And then there were four done.


And no, the red paint will not appear on the final product. The legs all have a spare 1/4" that I will shave off when the bench top is fixed into position.

As I worked, I noticed that I should have taken a little more care about where I chose to place the tenons. Another good lesson learned. For instance, while things looks pretty good from this angle,


they don't look so great from this one.


I probably should not have included the knot in the cut. Regardless, there is enough real estate in the negative space and the little notch that things will work out fine in the end. Besides, I need legs on the back (hidden) side, too, right?

The next step is to either cut the shelf runner mortises into the bottoms of the legs or start on the bench top mortises. I'll be conferring with Rangom Roger Green today to decide on which path to take.

Until next time...

Tuesday, March 29, 2016

Project Update: One Down, Three to Go

After resting for a couple of days, I decided to dive into cutting the tenons for the Roubo-style workbench legs. The first step was to cut the 30-degree dovetails using the new jig and a little 14 tpi crosscut carcass saw.


As you can see, the Laguna did a pretty nice job working with the cradle jig.


Though I finished the dovetail cuts on all of the legs, I only had time to complete all of the cuts on one leg.


I used the Delta 12" band saw to clear out the negative space and cleaned it up with a razor-sharp 1/2" chisel loaned to me by the inimitable Random Roger Green. In reviewing my work, I noticed a little tearout on one of the legs, so I toothpicked a little glue in and taped it up for drying.


It will be right as rain tonight.

My wife, Tonya, and I are going to look at new cars tonight, as well. I see a minivan in my future. Yes, I've grown weary of carting wood and power tools around in a KIA Rio. If they can lower my payments, we'll have a deal. If not, the Rio will have to do.

Until next time...

Sunday, March 27, 2016

Project Update: Parting is Such Sweet Sorrow

After much deliberation and a shot or two of Pusser's, I came to the conclusion that using the Delta 6" jointer twice in the last year meant it had to go to free up some room in the shop. Frankly, my preferred way of jointing/smoothing a board edge is to simply use the table saw. Thus, I had to release the machine  into which I had put so much time and effort. I purchased it from a Cool Craigslist Guy some time in late 2014 and spent the Winter Break refurbishing it in early 2015. You may recall the posts; if not, here's a refresher.


The condition in which the little fella came into the shop was, shall we say, not good. I spent a significant amount of time getting intimate with it using a wire brush wheel on a cordless drill.


I also replaced its drive v-belt with a link belt.


The result was, admittedly, pretty awesome.


I even replaced the little switch/name plate. You can also see in the photo above that I procured a mobile stand for it, which was a blessing. I was thinking during the refurb, "Gosh, I need to make this thing mobile like everything else in the shop." I jumped on Craigslist and, voila! - there was the mobile stand made precisely for this particular machine. And for just $40. Thanks, Cool Craigslist Guy.

But, the only constant at Tortuga Early Instruments Worldwide Headquarters is change. It really was quite difficult for me to make this call, especially since I had worked so hard on sprucing up the jointer. Finding a mint condition Craftsman 18/36 open-ended drum sander for $500 less than a brand, spanking new one helped with the decision; it was located in Mukilteo (northwest of Seattle), the place of my former abode, so my wife, Tonya, and I made the road trip yesterday to fetch it. It's amazing what you can fit into a KIA Rio.


The new machine now fills the hole where the beloved jointer once rested. This tool is a game-changer for me, especially given my physical challenges (getting older combined with a profession that has required me to sit on my butt for the last 30+ years = pain and suffering during and after sanding). Now, I can fine-sand just about anything my heart desires with a minimum of effort. I had always dreamed of having a drum sander of this size and quality, yet could not see a clear path toward acquiring one. I suppose the lesson here is to be careful what you wish for.

Until next time...

Thursday, March 24, 2016

Project Update: A New Jig for Those Pesky Leg Dovetails

Okay, I'll admit it, I ruined another set of legs. Holy cow. Normally, I use test wood to ensure proper alignment, but, for some reason, I chose not to do that for these legs. Overconfidence is a wonderful thing. The result: Things went sideways a little and one cut was good, the other not so much. I won't bore you with the details of complementary angles or a photo of my screwup. I will, though, proudly tell you about the solution I devised (yes, there is a happy ending to the story).

One of the reasons I purchased the Laguna SUV 14" band saw was to resaw wood. This is simply cutting pieces down to size, particularly when they're somewhat large and difficult to cut any other way. It comes with several features that make it good for resawing, namely, a pretty large deck that's lower than other saws (also good for my vertical challenge). In the deck are two miter slots, one on each side of the blade.

In reviewing my sled leg cradle idea over an ice-cold cocktail glass of Pusser's, I realized that all I ever needed to do was build a mini-sled small enough to fit on both the right and left sides of the blade. This would allow me to move the jig to the other side of the blade and flip the leg after the first cut to make the second. Yeah, sometimes, it takes me a while. You see the result in the two photos below.


And it just so happens it worked great on a test cut.


This is all I ever really needed - semi-shallow angled cuts at the front of the legs. Easy, right? So, tonight, I return to Parr Lumber to purchase another 12' 4x6 and get those darned tenons cut into them. It will be nice to get this behind me and get on with my life. 

And, no, the irony of doing back flips with power tool jigs to cut the legs for a workbench on which I will primarily use hand tools is not lost on me.

Until next time...

Monday, March 21, 2016

Project Update: The Do-Over Party Begins

As you know, I ditched the 6x6s for the Roubo workbench legs because I could not, for the life of me, get straight rip cuts set into the ends of them by hand. I was able to pick up a nice 12' 4x6 at Parr Lumber and have them cut it into four 36" pieces. It cost me an extra $2 for the additional chops, but I bit the bullet and absorbed the cost. Fortunately, the 4x6s are in much better shape than their 6x6s, so the benefits begin to accrue almost immediately.


With the legs procured, I continued the process of building a rip jig for the Laguna band saw sled that would allow me to cradle the legs in it for the dovetail cuts.


You can see 2" spacers being glued up in the photo above. When the first 4 1/8" cut is completed,


I'll flip the stick 90 degrees counter-clockwise and add the spacers to provide the correct height/protrusion for the cut.


I also changed the dovetail angle to 35 degrees. The shallower cut allows more space for the upcoming cuts to create the negative space and little ledge on the back side. Though I detailed this in my failed 6x6 attempt, I'll describe it in more detail as I proceed. I'll be making the first cuts tonight.

On a couple of completely unrelated notes, I received an Incra Miter Express table saw crosscut sled into the shop yesterday. This little sled is designed to accommodate any miter gauge, so I went ahead and mounted the Incra 1000HD to it. Once I got things calibrated, I ran some test cuts and it worked like a charm.


Of course, some of my luthier pals will tell me I'm wasting valuable blade real estate, but I was doing that with the old crosscut sled (the one I repurposed for the Laguna band saw), anyway. To them, I reply: What are my fingers worth? In the absence of a SawStop, this is the single best solution for avoiding kickback and not holding wood with my delicate, little fingies inches from the blade as I cut. Note the hold down clamp with the wheel handle. This is a good thing.

My wife is a life coach and held a two-day workshop in our home on Saturday and Sunday, so I was effectively banished until 5:00 p.m. both days. I took this time to explore a few flea markets and antique stores in the Portland Metro area. My primary discovery was that once the term "antique" is applied to an item, it immediately takes on a fine sheen of 22k gold that is undetectable by the human eye. Yeah, most of the tools I looked at were seriously overpriced, though I did pick up this nice hand drill for $10.


Something interesting, though, did happen to me during my explorations. As I viewed and touched and held the old tools and furniture in the various antique stores I visited, I began to have emotional reactions thinking about the people who put their blood, sweat and knowledge into the chairs and cabinets and toolboxes and hand planes before me.

I wondered about how they came to their levels of craftsmanship and if they supported families. I wondered whether they worked in a shop with other makers or worked alone and if they loved what they did or, like so many of us today, were simply stuck in a profession they did not enjoy.

I thought about how many of them might still be living and, if not, what stories their families tell about them. I wondered about what happened to their tools and if caring strangers have lovingly restored them for use in their own shops today.

These thoughts nearly brought me to tears several times, so I broke for some pub and grub to further reflect not only on what I'd seen but why I do what I do in the shop.

It was time well spent.

Until next time...

Thursday, March 17, 2016

Project Update: The Better Part of Valor

I tackled the final bench leg tenon last night and I can say with complete confidence that it was an utter disaster. I'm not kidding. A true tsunami-that-sneaks-up-on-you-and-causes-a-meltdown catastrophe. I used one of my little miter saws to start the cut lines, used the bigger (still small) tenoning saw loaned to me by Random Roger Green to deepen the cuts and then sawed with abandon using the big, Random Rog tenoning back saw.

Somewhere along the way, like the time I decided to take a corner a little too fast in the rain with bald tires, things started to go sideways and I was never able to fully recover. You'd never know it looking at the nice shots I took of the finished product. In fact, here's one now:


Doesn't that look great? It's not. It actually looks more like this:


At that point, I was done. And by "done," I mean quitting for good. As in selling all my tools and putting my time and energy into other, ostensibly more productive, things like playing video games. I took a break with some Pusser's and the tv and, by the end of the evening, decided I can do this. Sometimes, the better part of valor is knowing when to start over.

The result is that I began designing a cradle jig for the Laguna sled that will hold a 6x6 at just the right angle and protrusion to cut a perfect dovetail. Also key to this new approach is clamping a wood stop to the Laguna's table to ensure every cut is exactly 4 1/8" deep (more about this later). It was late and, you know, Pusser's, so all I could do was draw on some MDF.


The angles are correct and I intend to cut this piece in half and make two cradles, each of which will clamp to one of the little sled walls. The ellipses are where I will cut the holes for the clamps. This go-round, though, I will use 4x6s, which Random tells me are plenty big for the job. The cradle will still accommodate these dimensions, so I'm headed to Home Depot tomorrow to have them cut a 12-footer into four 36" pieces for me (got to fit them in the KIA Rio).

On a completely unrelated note, the 4'/21' flexible hose I purchased for the new, little dust collector was a bust. The one horsepower motor was not enough to suck anything up from such distances, so I cut it down to just over two feet and will drag it around the shop to use it; this is no big deal because it's on wheels and sports a handle for just such maneuvers.


Hey, at least I'm flexible, right? Just like a dust collector hose.

Until next time...

Monday, March 14, 2016

Project Update: The Roubo Leg Tenons

Once I got the tops of the bench legs evened up, I could start the exacting process of cutting the tenons into them. Tenons are the siblings of mortises - they're the relationship's male half that are inserted into the mortises once they're cut. In fact, the way they're cut is to trace the tenons onto the mortise surface because every tenon has its own set of unique characteristics. Yeah, no two are the same, especially when I'm cutting them.

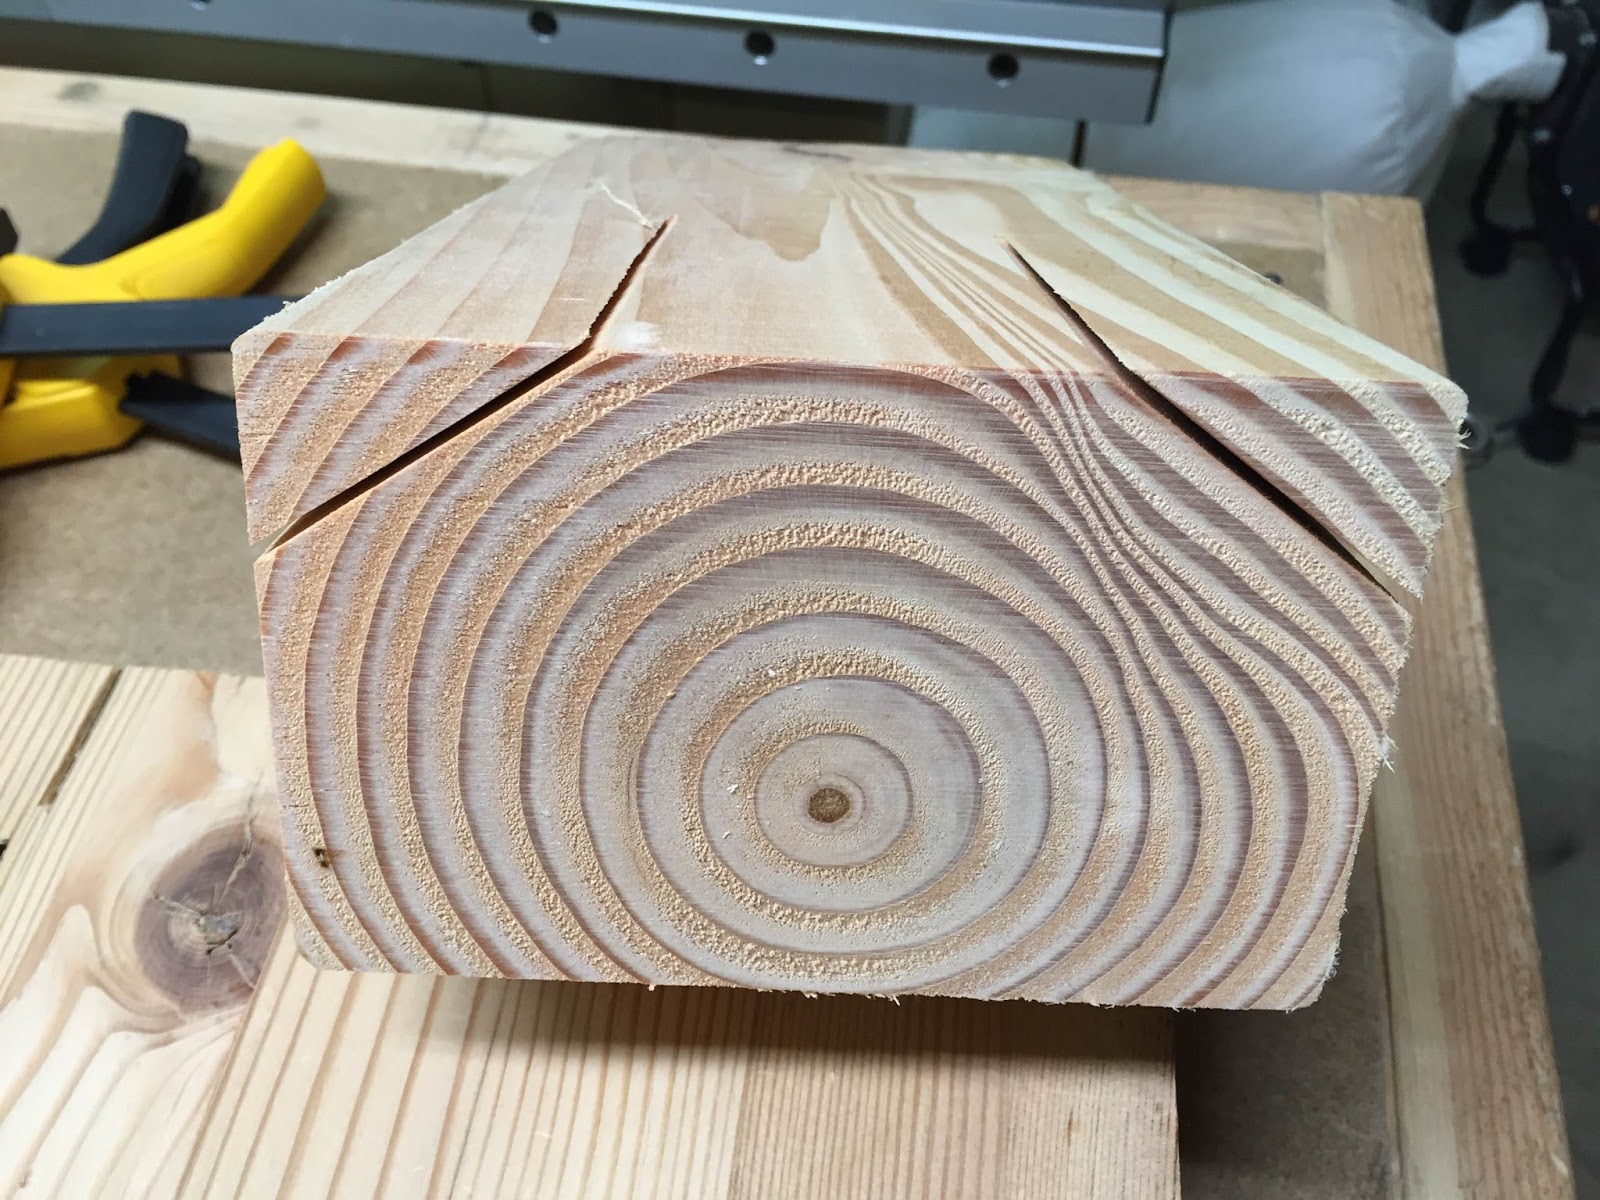
The first thing I did was divide up the tops into more or less three equal parts with a little notch left over. Once I got the lines drawn and cut to depth, I sawed out the small piece.


This left two tenon parts that ended up being significantly more difficult to complete than I could have ever imagined in my wildest nightmares. Okay, it wasn't that bad, but I'm not accustomed to working tenons or joints of this scale. The next part I tackled was to removed the center piece to create some negative space.


At first, I decided to hog them out using a Forstner bit on the drill press. After a break, I realized I could just bandsaw out this piece using the 14" Laguna with the 1" blade and then finish it up using Little Buddy, the 12" Delta.


This worked well and I was able to cut the space right to the cut line.

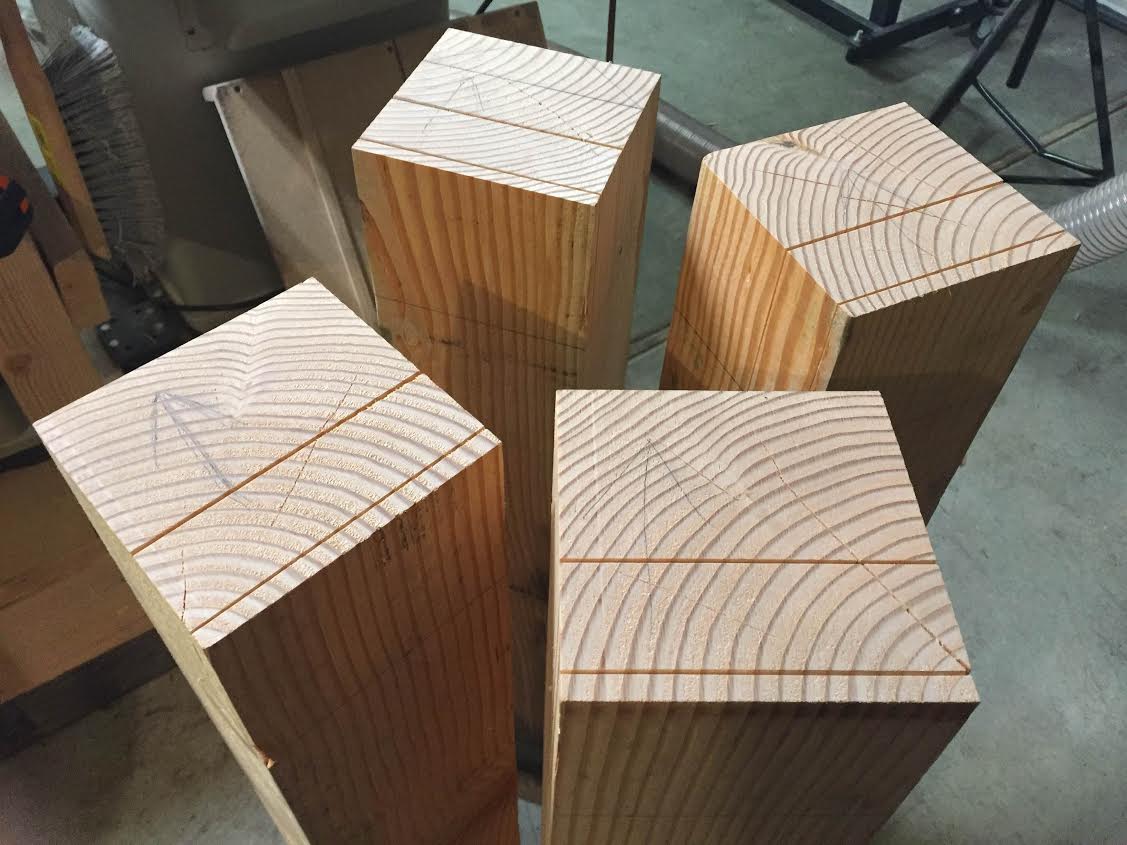
The next step was to tackle the dovetail joint at the front of each leg. Now, this might seem like an easy, straight cut. It's not. In fact, it's difficult for a variety of reasons. First, how does one lash the leg to the assembly table for cutting? Answer: 50" clamps and a smaller one at the base for stability. Next, how does one start such a cut? I came up with the hair-brained scheme of using my small, battery-powered Skil saw. Nope - it resulted in what I can only describe as a cut just this side of disaster.


After completing the two in the photo above, I was pretty demoralized, so I went inside and watched Bad Grandpa. It helped. While watching the movie, I decided to text Random Roger Green and he responded with an offer to come for a visit. Thank goodness. When Roger arrived, I think he could see I was about one step away from jumping off the ledge and, frankly, giving up the project. In all honesty, I had been thinking, "What am I doing? I'm in over my head here. I have no business trying to build this thing." You know, helpful self-talk.

Within ten minutes, Rog had talked me back from the ledge with comments such as, "I don't see anything here that really scares me," and, "Remember, it's just a bench." He also reminded me that we had cut the legs to allow sufficient room for major screw-ups; they're all cut at around 36" and the end result needs to be 31" long to reach the bench top. This means I could cut a really nasty tenon 4 1/8" deep and still had room to remove it and cut another. He also reminded me of Chris Schwarz's quote about taking small bites and nibbles and moving slowly, which I'm not really inclined to do.

So, I dove back in and started cutting again. Slowly. I started the first cut carefully using a small saw loaned to me by Random Rog. When I say slowly, I mean drawing one saw tooth at a time into the top. This is difficult because it's end grain and fir is not the easiest wood to work with because it's so soft. I eventually got the cut line started and I switched to a large tenoning saw also loaned to me by Random Rog. The first dovetail came off without a hitch - it was nearly perfect.


The last one, not so much. I think I rushed it too much in celebration of my stunning success with the third leg. Somehow, I was able to get the saw blade off track, resulting in a complete disaster. I sent a photo of the mess to Rog and his response was, "Well, good, you can practice again," So, tonight, I'll cut off the tenon using the Laguna and sled and have a little do-over party. Again, I will proceed slowly and carefully and, hopefully, have all completed so I can start the exacting and terrifying process of cutting the mortises into the bench top.

Until next time...

Thursday, March 10, 2016

Project Update: A Crosscut Sled for a Band Saw

I've been occupied with personal and other matters lately, enough that I've not been in the shop much this past week. Interestingly, Monday night after the Koopman and Mathot recital, I awoke from a dream in which I was repurposing my little table saw crosscut sled to cut more safely and easily on the Laguna band saw I purchased specifically for resawing wood. The logic behind this was the new Incra 1000HD miter gauge for the table saw obviated the continuing need for the sled. Tuesday night, I threw the little fella on the Laguna and sliced off one side, leaving plenty to support any wood I cradled in its loving arms.


The whole point of this exercise was to even the tops of the Roubo workbench legs so I can begin the process of cutting the tenons into them. The dream had me cutting the sled to size (it now butts directly against the blade - without touching it, of course) and supporting the extended side with a roller stand. I went ahead and threw one of the longer legs on and gave it a shot.


As you can see, it worked splendidly. I then cut all four legs and will be working on the tenons tonight and through the weekend. I'm hoping to have the thing built out by the end of the month so I can get back to work on the instrument. Only time will tell.

Until next time...

Wednesday, March 9, 2016

Project Update: Koopman and Mathot

On Monday, I attended a performance by Ton Koopman and Tini Mathot (wife and former student) for two harpsichords. The venue was First Baptist Church downtown Portland. It was nice to be back in that sanctuary after a 30-year absence. The event was hosted by Portland Baroque Orchestra and I saw a few notable Western Early Keyboard Association (WEKA) faces there.


The two harpsichords used for the performance were on loan from Byron Will and a client of his (sorry, can't remember her name).


They are nice Flemish two-manual instruments that must be quite heavy (all that marble, you know). I caught the photo below of Mr. Will in his natural environment during intermission.


The show started off with a few comments by Mr. Koopman before they dived right in and started playing.


The program was interesting and I even enjoyed the d'Anglebert played by Ms. Mathot (this helped further diminish my historic bias against early French music) and Mr. Koopman ran through the Bruna on his own.

  • Bach: Preludium and Fuga in C Major, BWV 547 for two harpsichords
  • Bruna: Tiento sobre la letanía de la Virgen in G Minor
  • Mozart: Fuga in C Minor, KV 426 for two harpsichords
  • Mozart: Sonata in D, KV 381 for two harpsichords
  • d’Anglebert: Deuxième Suite (G Minor) for harpsichord
  • Soler: Concierto in D Major for two harpsichords
  • Bach: Sonata No. 5 for violin and harpsichord, Monica Huggett, violin; Ton Koopman, harpsichord
  • Bach: Five Contrapuncti from “The Art of Fugue,” BWV 1080 for two harpsichords

It was also nice to see a harpcishord/violin duet with Monica Huggett, Concertmaster of Portland Baroque Orchestra, though I would have preferred some nice viola da gamba.


It was an interesting evening. My only concern was centered on the mean age of attendees (rough guess: 60). More on this later.

Until next time...

Tuesday, March 8, 2016

Project Update: A Visit to Casa de Cates

Last week, the day job took me to the Bay Area for the week. While I was there, Owen Daly was kind enough to formally introduce me to David Cates, a harpsichord performer who maintains an impressive collection of instruments in his home in North Berkeley. David and I have been Facebook Friends for a while now and this visit blossomed what I hope will be a long friendship. David is a talented and sensitive performer who understands not only the various literatures available to performers, he relates to each of his instruments as individuals.

One thing I did not do while David gave me a quick tour of a few of his instruments was take very good notes. I took some photos, yet it was quite overwhelming to see so many stunning instruments at one time. His collection consists of several harpsichords, a fortepiano, a virginal, and a muselaar, among others, and he offers a nice set of recordings, as well. I did not see the entire collection, as the hour grew late and, well, we needed to eat. Fortunately, David is an excellent cook and was kind enough to whip up a really delicious chicken (thigh) dish with peanut sauce, rice, and bok choy. It was really, really tasty.


A man of many talents. But, I digress.

David owns two of Owen Daly's instruments, a French double after Goujon and a small Italian single (it's very possible I'm not correct on the French instrument - both Owen and David will correct me on this, I'm sure).


I do like the soundhole rosettes, so you will see a few photos of those below, as well.

I was fascinated by both the design and sound of the muselaar; it's just a wonderful instrument.


And I believe this is a photo of the rosette of the virginal he showed me.


And...a couple more harpsichords and the fortepiano.


Thank you, David, for a relaxing, enjoyable evening at Casa de Cates, I hope to see more of you and your instruments in the near future.

Until next time...