Thursday, December 31, 2015

Day 111: Cap Completed

I was able to trim down the miniscule pieces I used to repair the wrestplank cap tearout so that it now looks pretty decent - good enough for government work, as they say.


Every year at this time of year, I slow production down a bit and concentrate on cleaning and repairing tools and preparing for the coming year. This year, I will be cleaning the band saws and table saw, replacing the knives on the Delta 6" jointer, and giving the 12" planer a tune-up. Along with these tasks, I'll start the process of refurbishing a couple of old Stanley hand planes I've picked up on my travels.


The top photo is of a No. 07 I found in a junk shop near where I grew up. I put a No. 04 next to it for scale. The thing is huge and is generally referred to as a jointing plane. The photo below that one shows a No. 78 that's in pretty bad shape. In fact, I'm not sure he can be saved, but I'm going to give it a shot. In his case, I'll use electrolysis to clean off the copious amounts of rust. The No. 07 (the big fella) just needs some oiling, cleaning, and sharpening. As I shift more to using hand tools, these will become an important part of my lutherie practice.

On an unrelated note, I recently received Grizzly's 2016 print catalog. Holy cow. After looking through just part of it, I was left asking, "What don't they sell?" As with all things Grizzly, it's packed with fairly good (not top-drawer) tools at reasonable prices. They even offer lutherie supplies! I'll be spending more time with the catalog and will post here if and when I decide to purchase anything in it.


Until next time...

Tuesday, December 29, 2015

Day 110: Cutting Things

When I don't work on the instrument for more than two days, I start getting antsy because, you know, I'd like to actually finish it someday. The recent Christmas holiday prevented me from spending much time in the shop, so I jumped back out to my Sacred Space in earnest yesterday. The first thing I concentrated on was getting the Sitka spruce wrestplank cap trimmed flush to the red oak plank.


In doing this, I neglected to route the short sides first. This would have prevented the inevitable tearout I experienced when routing the long sides first. The most frustrating aspect of this is not that spruce tears out quite easily, it's that I knew better and charged ahead without thinking things through. The result was that I needed to chisel out the torn pieces and glue in tiny, little pieces of filler, hoping they will not be too obvious in the final product.


I did trim it up a bit with a razor knife, but then decided to let the glue set for another 12 hours before hacking away at it again. Another lesson learned.

Once I had the cap glued and taped up, I turned my attention to the bentside. I'd been successfully avoiding cutting it to width, which is really the height of the case, for a couple of months. So, I decided yesterday was the day.


As you may recall, I did not follow Mr. Miller's instructions in his eBook Most Excellent when laminating the bentside. Mr. Miller directs the builder to leave one of the boards 1" heavy in width, creating a straight line for trimming it to size. Of course, I ignored this directive and ended up with the boards overlapping so awkwardly at each end that I needed to add a thin poplar strip to one side to create a straight edge for the final cut.

In the first photo above, you can see how I used the thin strip against the table saw fence to get a perfectly straight cut. It worked like a charm, but I would have preferred to have not had to work up the kludge. In the second photo, you can see where I moved the fence to the other side of the blade for the final cut. This resulted in a loss of the blade width in the final measurement. Fortunately, I had the presence of mind this time to measure the distance from the fence to the blade - three times.

I cut it a little rich, knowing I would be cleaning up the edge with a newly sharpened hand plane.


I'm quite happy with the end result, though I'm not sure how the final veneer of quarter sawn red oak will cover it once it's mounted to the case bottom. I need to think this through very, very carefully before proceeding. I'll figure it out, it's just going to take some finesse on my part. If I were simply painting the case, I would not have to worry about the 1/32" tolerances for the veneer. Heck, it sounded like a good idea at the time.

After the bentside, I went ahead and cut the cheek, tail, nameboard, and lower belly rail pieces from poplar. I may end up replacing the nameboard with a solid piece of quarter sawn red oak, rather than laminating the poplar. Before making that decision, I'll confer with Owen Daly about it and report back here.

Until next time...

Monday, December 28, 2015

Project Update: A Day with the Master

Owen Daly of Owen Daly Early Keyboard Instruments is one of the Master Builders I frequently mention on this blog. I met Owen through a harpsichord group on Facebook and was delighted to learn he lives less than an hour south of me in Salem, Oregon. Owen has been a kind and generous mentor over the last year or so. From time to time, he invites me down to his shop to show me what he's up to, so I went down to see him on December 23.

Best. Christmas. Present. Ever.

Before I went down, we had agreed to cover a few topics I've been a little sketchy on. The list included hand plane sharpening and maintenance, hot hide glue sizing and use and conversation around the Ruckers 1640-ish instrument that is the main subject of this blog. As a bonus, Owen threw in a tutorial on stringing using some of Stephen Birkett's (yellow) brass wire. Observe Owen in action below.


I learned more in those few short hours with Owen than I have in the last six months. He truly is a National Treasure and it's an honor to call him my friend (and mentor).

This Italian harpsichord in progress is an example of some of the amazing work the man produces on a regular basis.


As you can imagine, I came home locked and loaded - at least as far as sharpening goes - so I broke out the Grizzly sharpener and went to town on my planes and chisels.


I don't have any Shapton waterstones for honing (like those in Owen's photo above), but I was able to order up a set of 1000/4000 and 3000/8000 stones; they're in transit now. I ended up using the fine side of my trusty, old diamond stone to get all of the tools razor sharp. What a difference this will make in my accuracy and productivity. Thanks again, Owen.

On a completely unrelated note, I was able to successfully store (hide) all of the walnut from the Goby Walnut and Western Hardwoods Free box. It will all now live behind my main toolbox. Given the difficulty trimming down the wood and finding a place to store it, I've managed to free myself of the inclination to visit the Free box again any time soon. Or ever.


We also made our monthly pilgrimage to Astoria, Oregon over the Christmas weekend where I found a breast plate drill at Astoria Vintage Hardware that I've been wanting for quite some time.


It needs a little work, but is in vastly better shape than some of the others I found. Like me, it's a little rusty and rough around the edges, yet will come back to life with a little TLC.

Until next time...

Monday, December 21, 2015

Project Update: It's Raining Walnut

From time to time, I stop by Goby Walnut and Western Hardwoods to see if they've put out their Free box. Well, a little voice kept telling me to stop by last Friday and guess what I found.


Not just one Free box, but TWO were out! This is the first time I hit such a motherlode, so I went ahead and packed the car with everything I could pull out of the boxes.


The only area of the car I didn't fill was the front passenger seat. Eventually, I got the wood loaded into the shop for closer inspection.


Many of the pieces have cracks, knots and live edges that needed to go before storage. I used the trusty Laguna 14" SUV bandsaw to get everything trimmed up, including processing five black walnut logs I picked up a few weeks ago. The photo below is scrap from the cleanup process.


I posted it on Craiglist and it was all gone within an hour. This left me with an assembly table full of cut walnut that needs to be stored somewhere in the shop. Where that will be is a mystery to me at this time, though I think I can squeeze most of it in behind my main toolbox without losing too much shop space.


The lesson from this is that I will be more careful in listening to that little voice. If I make another run that results in this much wood again, I honestly have no idea where I would put it. Besides, I need to get back to work trimming the instrument wrestplank cap and getting the case sides cut and jointed.

Until next time...

Friday, December 18, 2015

Day 109: Capping the Wrestplank

Once I had the wrestplank cap mostly completed, I visited Crosscut Hardwoods where Grumpy Wood Guy (aren't they all?) helped me price a 2" x 10" x 72" piece of red oak for the wrestplank itself. In the wood world, measurements are rarely what they seem and the "two inch" thick board was actually 1 3/4", which meant I needed to plane 1/4" off to arrive at the proper thickness. I started by breaking the big board down on the table saw and then planing it.


The final size for the wrestplank was 1 1/2" x 7 5/8" x 31 1/8". Once I had it cut and planed down to size, I threw the cap on to see if it would actually fit. Ideally, I wanted a spare 1/8" around all edges that I could route off later.


Bingo - a clean 1/8" all around! The next logical step was to glue the cap to the plank.


What was not logical was the approach I took for the glue-up. I had put considerable time, effort and, frankly, money into creating the assembly table/go-bar deck a couple of months back and then neglected to use it in this case (thanks to Master Builder Kevin Spindler for pointing this out). Why I ignored the go-bar approach is completely beyond me. Perhaps I was overly influenced by Mr. Miller's eBook Most Excellent in which he does not use a go-bar clamping setup. I don't know. It will just have to remain one of life's little mysteries.

There was also some question voiced by Owen Daly of Owen Daly Early Keyboard Instruments regarding the use of hot hide glue for this step. Well, I don't have a glue pot, hide glue chips and urea nor do I have enough Titebond hide glue handy to have done the job. Owen's point is that sizing - pre-applying an extremely thin layer of hide glue to all pieces to be glued and then letting it dry before the final glue-up - produces an extremely tough bond. In this case, all I had handy was Titebond Original, so that's what I used. I'll be visiting Owen's shop next week for a mini-workshop on the use of hot hide glue (thanks, Owen).

In the end, everything came out okay.


The cap is glued on securely and is perfectly flat. Now, I just need to run a router around the edge to make the cap flush with the main wrestplank body and I'm good to go. I'll get this worked up tonight and get back to working on the case sides. The first task there will be to cut the sides to width for final jointing.

Until next time...

Tuesday, December 15, 2015

Day 108: Finishing up the Cap

Okay, after posting on Facebook and receiving feedback from the Masters and others, I've decided to start calling it a wrestplank, rather than a pinblock. So, in keeping with my new terminological bent, I present the completed jointing of the wrestplank cap.


I just need to clean up the final joint with the scraper and I can call it good. The next step will be to pick up the oak piece I need to complete the wrestplank and get this baby mounted on it for final sizing.

On a completely unrelated note, the cool Craigslist guy I sold Big Bertha to emailed to let me know he had some maple I might be interested in. I'm always interested in maple, oak, cedar, spruce and specific types of pine, so I went to his house to see what he had. I ended up picking up a beautiful 1" maple board about 5' x 18" with nice birdseyes and some figuring. This will be perfect for another project I'll be embarking on soon.

On the way home, a little voice said, "Free Box." Repeatedly. This meant I should run by Goby Walnut and Western Hardwoods in Northwest Portland to see if they had set out their Free Box. Well, they had and it was filled to overflowing. It's hard for me to put into words just how really cool and somewhat extraordinary this is. First, the fact that they load up such a box and put it out for hacks like me to dumpster dive is amazing. What's even more amazing is that it's an extremely rare occasion to find the box chock-full of walnut and other woods.

The old Free Box bursting at the seams was my own, little Christmas miracle. I spent the better part of 20 minutes picking through the motherlode and filling the back of my KIA with the spoils.


Most of the pieces will be handy as veneers, yet there were some pretty sizable chunks that I'm sure I'll find a use for in the future. This was, indeed, a major score. The one thing I didn't count on is that walnut smells sour, which made the drive home, um, interesting. Regardless of the smell, I'm thankful to see my stock of walnut growing.

Until next time...

Sunday, December 13, 2015

Day 107: The Pinblock Cap

While I've come to learn there's real danger in not following Mr. Miller's instructions to a T in his eBook Most Excellent, I still strike out on my own from time to time with varying degrees of success. The next step I should have followed in the book was to prepare the sides of the case for gluing. A lack of funding in the weeks before Christmas have prevented me from accomplishing this (yeah, I can't afford the quarter sawn red oak veneer for the sides until after the holidays), so I looked around the shop and realized I had the materials to start the pinblock of the instrument.

The harpsichord pinblock, or wrestplank, is a thick piece of hardwood that holds tuning pins for the instrument. As such, it must be sturdy and solid, so I will be following Mr. Miller's advice and making it from red oak. There is, though, a cosmetic consideration that requires me to cap the piece with quarter sawn spruce to match the soundboard when I get to that part of the project.

Fortunately, I happened to have some fairly nice Sitka spruce in stock that I had picked up at Woodcrafter's for $6.95 a bookmatched set. A couple of flaws prevented these from being used as, say, guitar tops, but I knew I could someday use them for guitar bracing or for another, unforeseen, purpose. In this case, I was able to cut them up in a way that eliminated the flaws. I started by running the side edges through the jointer.


Once they were cleaned up, I ran them through the planer, leaving them a little heavy for later hand planing and card scraping down to 1/8" (3mm) thickness.


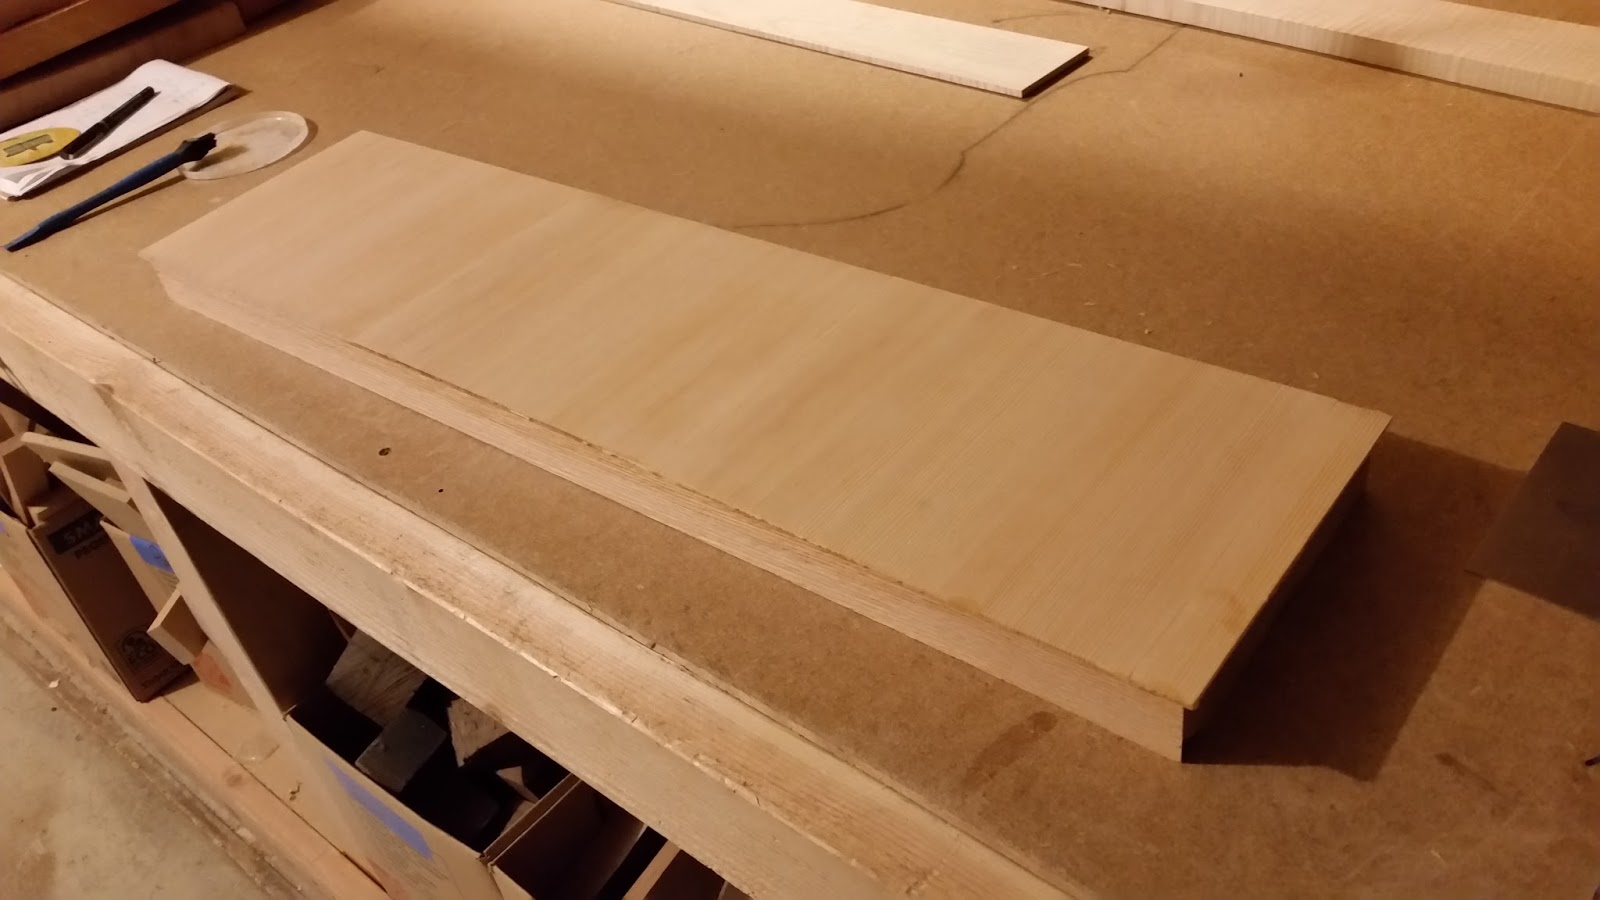
They looked pretty nice once I planed and scraped them down.


The next step was to straighten up the ends. Both ends needed it, which I completed on the table saw.


Once that was done, I went ahead and cut them to a width of eight inches so that the grain ran front to back along the short side. You can see one of the flaws in the photo below that prevented these pieces from being used as guitar tops.


These are the pieces laid out as they will be glued together and then mounted to the top of the wrestplank.


I then broke out the trusty, old guitar top gluing jig. This jig simultaneously pulls the pieces being glued together along the horizontal plane while also keeping pressure on the top of the piece so they don't buckle and ruin your day.


I have never gotten the hang of making perfect figure eights with the twine. I see guys using their jigs on Facebook and their twine and wedges look orderly and beautiful in a utilitarian sort of way. There's nothing orderly or beautiful about my jig, but, hey, it works. At least I get the utilitarian part right.

I glued the pieces using the jig in groups of two. Once they had dried for a couple of hours, I went ahead and threw them under some pressure for the final glue up. The resulting jointed piece will be 8" x 33", which will be cut down to 7 5/8" x 31 1/8" when glued to the wrestplank.


Yes, we use only the latest high tech clamping equipment at Tortuga Early Instruments Worldwide Headquarters.

Once I get the final joint planed and scraped to my satisfaction, I'll pick up the oak to work on the foundation of the wrestplank; it will be an 8/4 (2") piece that I'll work into shape for the mounting of the cap and final sizing.

Until next time...