Sunday, November 29, 2015

Project Update: Checking out Veneer

Since I've decided to set the case bottom aside for now, I'm going to go ahead and start preparing the case sides. One of the crucial steps in finishing them up will be veneering them with quarter sawn red oak in keeping with my Arts & Crafts/Mission design theme. I stopped by Crosscut Hardwoods in Portland to price some of the stuff. It's not cheap, but given what it accomplishes, it's certaily less costly than solid oak (which I would never use on a case).


As you can see, one 4' x 8' sheet is $69.00. I'll go with the paper-backed product and use contact cement to take these astonishingly thin sheets to my desired 1/16" thickness. I'm planning on skating through the holidays and then purchasing a sheet to get those sides completed.

On a couple of unrelated notes, I also spotted this at Crosscut Hardwoods:


I've never run across wigglewood before and cannot imagine a scenario in which I might need some. As my buddy, Phil Bradfield, said on Facebook, it's not a hardwood. I'll just leave it at that.

Another Tortuga Early Instruments fun fact is that I burn incense whenever working in the shop. My flavor of choice is Nag Champa, which is widely regarded as temple incense. Because the shop is my Sacred Space, this only makes (in)sense.


Until next time...

Wednesday, November 25, 2015

Day 106: Drawing Lines

Following Mr. Miller's eBook Most Excellent, I went ahead and starting drawing the cut lines for the case bottom. The first step was to draw the tail angle at 65 degrees from a point measured 71 5/64" from the keyframe end.


I then drew in the bentside lines - inner and outer - so I could begin the process of rough cutting around the outside line. The thing is, I forgot that my bentside is 1/8" thinner than the final 1/2" width because I'm adding a thin veneer of quarter sawn red oak when I finish up the sides. This means the lines I drew last night will need to be redrawn at a later date.

On an unrelated topic, I sent an email to Owen Daly of Owen Daly Early Keyboard Instruments last night asking him about the bentside liner; specifically, whether it should be laminated or kerfed. Owen said to "always refer to the fossil record," which means kerfing, but I'll explain more about that when the time comes. He also recommended I set the bottom aside until the case is completed, which, given the fact I cannot draw accurate lines until that happens, is great advice (again).

But...but...but...the lines look so good...


Where's my eraser?

I did start cutting the tail line, which would have been okay - until I realized how late it was. I didn't want my wife, Tonya, and the neighbors to show up in the shop with torches and pitchforks, so, thankfully, I decided to cool it for the night. Now, I will cool it for what looks to be a fortnight (based upon the pace of the Tortuga). This is okay, I'd rather do it right the first time because redoing it right takes too long and is expensive in the long run. How would I know? Don't ask.


In the meantime, I'll be taking a trip to Crosscut Hardwoods in lovely Portland, Oregon to look at purchasing that red oak veneer. Hopefully, they're opened on Black Friday.

Until next time...

Monday, November 23, 2015

Day 105: Really Finishing the Case Bottom

I was able to spend more than nine hours in the shop on Saturday. This is a personal record. Please alert the media. More importantly, this time allowed me to complete the glue-up of the case bottom. Before embarking on the glue-up, I measured the fit between the soundboard piece and the keyframe piece. I was short about 1/8", so I went ahead and lopped some off and glued on another piece. As Owen Daly of Owen Daly Early Keyboard Instruments said, it was a "nip and tuck" job.


Once the glue dried on this little piece, I could get to the more serious work of the final bottom glue-up. Mr. Miller, in his eBook Most Excellent, recommends tacking wedges to the assembly table and using additional wedges for clamping the pieces. I just could not bring myself to nail into the hardened assembly table top, so I came up with a system in which I use the table saw as a stop at one end and a board clamped to the other where I used the wedges. The photos below illustrate the detail of the wedges.


In the end, I realized I could probably have been just as successful without the wedging system by simple snugging the board clamped to the assembly table against the pieces I was gluging, but I wanted to honor Mr. Miller's directions. Every time I ignore his guidance, something pretty horrible happens, yet I think this time I could have used my own system fairly successfully.

The photo below illustrates the clamping system in all its glory.


Ultimately, this worked fine and I could call the bottom completed.


The next step in Mr. Miller's eBook Most Excellent is to begin the process of putting the sides together. The first step is to make tick marks on the bentside for cutting. I will also need to plane down the remaining poplar for the spine, cheek, and tail - perhaps this coming weekend.


On an unrelated note, I had been keeping my hand planes at one end of the assembly table because I really had nowhere else to put them. I mounted a shelf I had built a few years ago to the wall above the toolbox and got the planes up and out of the way. Sometimes, it's the little things.


I also managed to get rid of a bunch of planer shavings and table saw sawdust simply by posting it on Craigslist; it wasn't up for more than two hours when a cool Craigslist dude showed up at Tortuga Early Instruments Worldwide Headquarters and took it all away.


Thanks, cool Craigslist dude.

Until next time...

Friday, November 20, 2015

Day 104: Finishing the Case Bottom

I was able to get the sixth and final case bottom board jointed last night.


But...this is not the final step for the bottom - I still need to glue this structure to the piece that will hold the keyframe. This will be somewhat problematic, as I have not yet figured out how to actually accomplish this. I suspect it will involve using the table saw as part of the bracing/clamping setup. I'll get that finished up this weekend so I can move on to the next step: mounting the sides.

Until next time...

Wednesday, November 18, 2015

Day 103: Still Gluing the Case Bottom

Well, I'm still in the process of gluing up the case bottom. One of the best pieces of advice I've received regarding this step came from Owen Daly of Owen Daly Early Keyboard Instruments: "Don't overthink it." I paraphrase, but I'm allowed - it's my blog. Over the last few days, I've glued up five boards.


I've been using Garret Wade Gap Filling Glue on recommendation from luthier Mark Roberts of Mark Roberts Guitars and Ukuleles. I met Mark a while back when I sold a little Delta benchtop jointer on Craigslist and he just happened to walk through the door of Tortuga Early Instruments Worldwide Headquarters to finalize the purchase. It was a complete coincidence that he builds some of the nicest acoustic instruments in the world. When Mark recommends something, I listen.

Fortunately, the glue is quite easy to clean from wood after it has dried. For this, I use a 100 year-old Stanley Bailey #4 hand plane with a corrugated bottom that has the blade set to shave a fraction of a millimeter from the board. Of course, I also use it to even out any misalignments between boards, should there be any, which there never is (uh huh).


My wife, Tonya, and I picked up this little puppy at one of our favorite places, Astoria Vintage Hardware, in Astoria, Oregon for $35 during one of our monthly pilgrimages to that fair city. I hope it's around for another 100 years in the shop.

The final step will be gluing up the remaining 18" board, smoothing it out with the plane and card scraper, and then gluing the completed product to the piece that will hold the keyframe. Once that's done, I'll need to return to Mr. Miller's eBook Most Excellent, mainly because I have no idea what he will have me doing next.

Until next time...

Monday, November 16, 2015

Day 102: Gluing up the Case Bottom

I was able to start the glue-up of the case bottom over the weekend. There's not much more to report than that - apply glue, put on clamps, weight down to avoid cupping. That's about it.

The photo below is of the first two boards after they've been planed and scraped into submission.


As you can see in the photo above, I was able to get the third 60" board glued up using our state-of-the-art clamping system. Only the best at Tortuga Early Instruments Worldwide Headquarters. Rather than bore you, dear reader, with more photos of boards, I'll put up another post when I have all of them glued, planed and scraped.

Until then...

Friday, November 13, 2015

Day 101: Preparing the Bottom

I managed to pick up some clear, or select, pine at Lowe's earlier this week and finally found time last night to work with it. In preparing the case bottom, the first step is to plane the wood to 1/2", so I brought out the trusty 12" planer and got to work (I'm pretty sure the neighbors love this at dinner time).


The boards were originally 72" x 6" (really 5 1/2") x 1" (really 3/4"). I would eventually need to shorten them all and rip them to 5 1/4" after they were thinned to 1/2" (I really do prefer the metric system).


The final cut list for these boards:

3 - 60" x 5 1/4" x 1/2"
1 - 40" x 5 1/4" x 1/2"
1 - 30" x 5 1/4" x 1.2"
1 - 18" x 5 1/4" x 1/2"

Mr. Miller, in his eBook Most Excellent, lists an additional 10" x 5 1/4" x 1/2" piece, but I'm not seeing how it would fit into the current scheme of things.


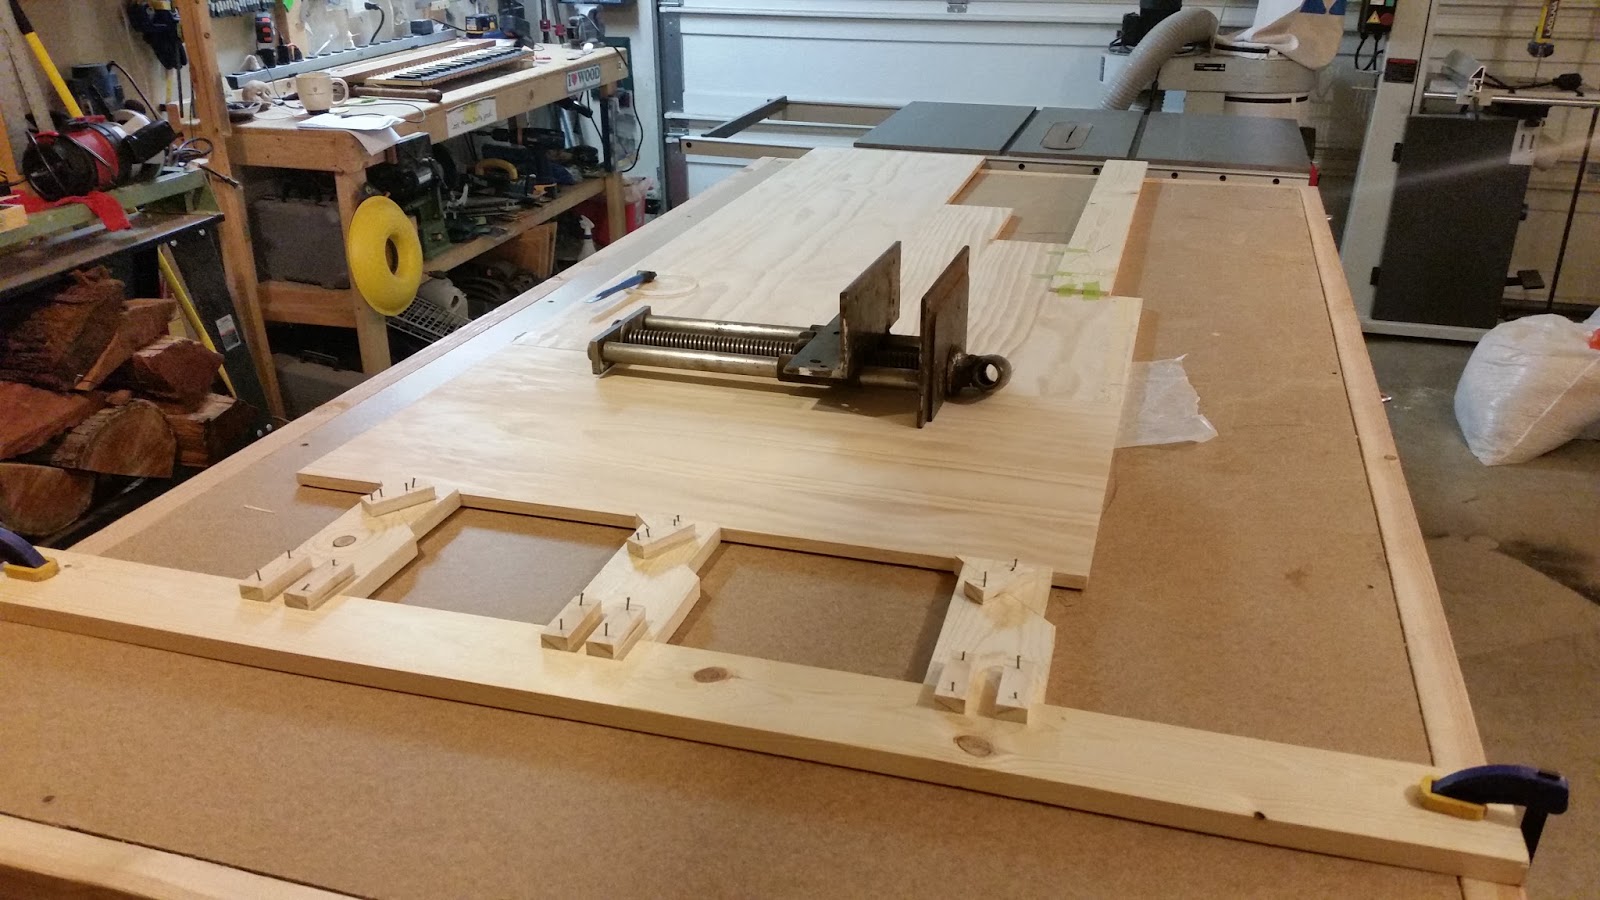
For dramatic effect, I went ahead and placed the unfinished bentside on it and snapped a photo.

Things are starting to get real.


On a tangentially-related note, I had to address a self-created issue with the bentside that I had successfully avoided until last night. Mr. Miller in his eBook Most Excellent often provides instructions that I simply refuse to follow. In this instance, he advises leaving one of the lamination boards a little wider than the other. I didn't see that he explained this as a way to help create a straight cut later on. Duh.

You see, when laminating, there is a danger the boards will overlap with a little offset on one or, really, both, ends. This is what happened to me, though one of the ends is pretty clean. Regardless, I realized I have no consistently straight edge to make the final width cuts when that time comes, which will be sooner, rather than later. So, I decided to seize the opportunity to use the leftover trim cuts from the case bottom boards as straight edges by gluing a couple of them to one side of the bentside.


In the photo above, I'm using a measuring stick cut at exactly 11 inches and I was careful to align the end of the stick with the true left side of the bentside. Then, I went ahead and glued and clamped the trim pieces to the edge.


I posted this up on Facebook and expected a barrage of comments from the Master Builders about how I'd screwed things up yet again, but...crickets. I'll take it. The result will be a straight edge that will allow me to proceed with cutting the bentside to width with complete confidence.

On a completely unrelated note, it was my birthday on 11/11. Yes, my birthday is a national holiday. Every year. Last weekend, my wife and I took our monthly pilgrimage to Astoria, Oregon where we visited one of our favorite shops, Astoria Vintage Hardware. Well, lo and behold, I found a nice, old wood vise hiding in the back and Tonya agreed to purchase it for me (for $60) as my birthday present. She's the Best.


Now, I just have to figure out how to mount the thing on the assembly table. Master Builder, Owen Daly of Owen Daly Early Keyboard Instruments, tells me I will need another for it/them to be as effective as I want. He also tells me that I probably won't be able to stop at just one...or two...or...

Until next time...