I've spent a pretty good chunk of change building out the shop, acquiring (the right) tools, and learning lessons far and wide. One of the best purchases I've made is the Shapeoko 3 XXL CNC machine. While it's largely a hobbyist's model, I love the darned thing. It fits perfectly in the shop and doesn't care which software I use to generate gcode to make it run. I use Autodesk Fusion 360 (for CAD/CAM) and two packages that came with the machine, Carbide Create and Carbide Motion, to also make designs and run the machine.
The worst thing about having a tool like a CNC machine is that it's a lot like a hammer - once you have a good one, everything starts looking like a nail. Fortunately, a CNC is not a one-stop answer for everything. In fact, it's quite limited in what it can for for me as I complete the instrument. Of course, as I learn more, that will change, but, for now, it helps me muddle through tasks that would otherwise be quite difficult to accomplish. Case in point: Cutting the rose hole into the soundboard.
I considered several ways to accomplish this. I thought about a hole saw, but had visions of the soundboard ripping to shreads under its marginally sharp teeth. Then, I thought I'd use the CNC and tried cutting the hole with an upcut router bit. A bit is defined partially by which way its spirals wrap around the bit when you hold it up by the end that is inserted into the router. If the spirals wrap to the right, it's an upcut bit; if they wrap to the left, it's a downcut bit. Some bits even have a combination of both.
An upcut bit drives the shavings and cut, as you would think, up toward the top of the cut. This is best when you want the bottom edge of the cut to be clean because this will leave a fuzzy top cut. When I tested an upcut bit, it left a fuzzy edge around the top circumference of the test material that was simply not acceptable. So, I headed to Lowe's and could only find a Dremel downcut bit, which didn't work too very well at all - it left steps in the cut, which is never a good thing. Eventually, I ordered a 1/4" downcut bit off of eBay and sat back to await its arrival.
In the meantime, Owen Daly recommended I visit him to observe how he cuts his soundholes using a circle cutter that fits into the drill press. I then remembered I had purchased one years ago and dug it out only to discover it was from that Harbor place and, basically, was a piece of junk. The test cut photos below attest to this.
The second one actually burned the wood. While I enjoy the scent of mahogany smoke as much as the next guy, it was not that pleasant this time around. I did a little research and realized I needed a better cutter, but, as with nearly every step of this project, life intruded and I was pulled away on other matters.
Until the downcut bit I ordered arrived. Then, the fun began.
The first thing I did was to run several test cuts on some cherry. Because the soundboard is roughly 3mm thick (less in some places), I set the cut pass depth at .5mm (which would require 6 passes based on the 3mm thickness of the soundboard) and let her rip.
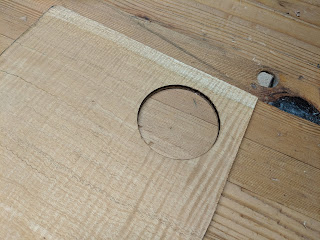
I was quite pleased with the quality of the cut - no fuzz whatsoever - so I set the soundboard up on the CNC, held my breath, and went for it.
The result was a perfectly cut hole with a diameter of 69mm.
I shared a photo of the cut with a friend who owns a large CNC and he said, "That's one expensive circle." My reply: "Yeah, I just threw $1500 down a soundhole." Rest assured, I'll keep at it so I can amortize the cost of the machine into other cuts. Besides, it's really kinda fun.
Until next time...


No comments:
Post a Comment