Today's post will only discuss the completion of the Roubo-style workbench that carved the better part of four months out of instrument production time. I hope it was worth it. I'm pretty sure it was. As I convert more and more to hand tools - planes, scrapers, chisels, etc. - it became more and more apparent I needed a bench that would support those efforts. Fortunately, I have a friend in Random Roger Green who has worked with Christopher Schwarz to build his own Roubo bench out of French white oak in Schwarz's shop. I could not have completed the bench without Roger's guidance, help and, frankly, tools.
For better or worse, this will be my next-to-last post about the construction of the bench. The only tasks left to accomplish are drilling of the holdfast and dog holes that will allow me to use holdfasts and dogs for clamping. What are holdfasts and dogs? Holdfasts are the shaped iron hooks that, essentially, get jammed off-kilter into their attendant holes and dogs act as stops for clamping, as well.
This week's efforts were directed at completing the leg vise and getting the bottom shelf installed. The work to complete the leg vise was centered principally on getting the chop - the part that holds the handwheel and moves in and out from the bench - into shape.
The first step was to take the thing to Random Roger Green's cavernous shop to put the chop on his enormous Powermatic jointer. We set a stop to allow for four untrimmed inches at the top (the thickness of the bench top) and cut it 1/8" deep. As with anything Random helps me with, it was perfect and trimmed up without a hitch. Once back at Tortuga Early Instruments Worldwide Headquarters, the next step was to think about whether I wanted gently sloping sides or more decorative curves. I decided on the latter and broke out the trusty pot lid to draw the top curves.
It's important to always be technically accurate in the shop, hence the pot lid. I drew the bottom curves using a magnetic parts dish, as well. Once all lines were drawn, the first cut I made was on the Laguna SUV to get a straight line up the sides. Then, I put it on Little Buddy (the 12" Delta band saw) and cut the first curve.
Then, I cut the lower curves and shaped the top.
A little sanding on the Ridgid oscillating spindle sander turned me into Darth Molnar, but I muddled through.
Once I got everything sanded down, I oiled the screw, waxed up the metal crisscross pins and threw the chop on and, voila! - it worked!
I still need to pick up a some suede to mount on the chop and table and also for the tail vise at the other end of the bench. The suede will protect anything I put in them and allows me to visit the local craft store, which I'm really looking forward to.
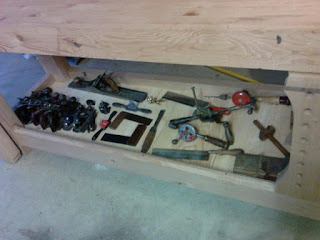
Once I was done with the leg vise, I turned my attention to the bottom shelf that acts as the place of repose for all of my hand tools. Fortunately, I don't have too many at this time. I picked up a couple of eight foot 1 x 12 pieces of #3 pine at a local lumber yard, mounted a 1" rail on the bottom sides of the stretchers, and cut the pine to length. I had to notch each of the end pieces to fit around the legs - this was the most difficult thing I had to do to get the shelf completed; it took about 10 minutes, probably less.
As you can see, it worked famously and freed up a rack shelf for, yep, MORE WALNUT! Speaking of walnut, Random made me a chisel holder to be mounted on the back side of the bench and presented it to me a few months ago - another fine product from the Goby free boxes.
The chisels in the photo above are on loan from Roger and will be returned shortly, I just wanted to illustrate how the holder will be used. Thanks again, Roger, I'll return the favor soon.
The nearly-completed bench in all its glory:
Later this week, I'll place and drill the holdfast and dog holes and then get back to the instrument full time.
Until next time...


No comments:
Post a Comment