Monday, May 14, 2018

Day 173: Pulling Out the Big Gun

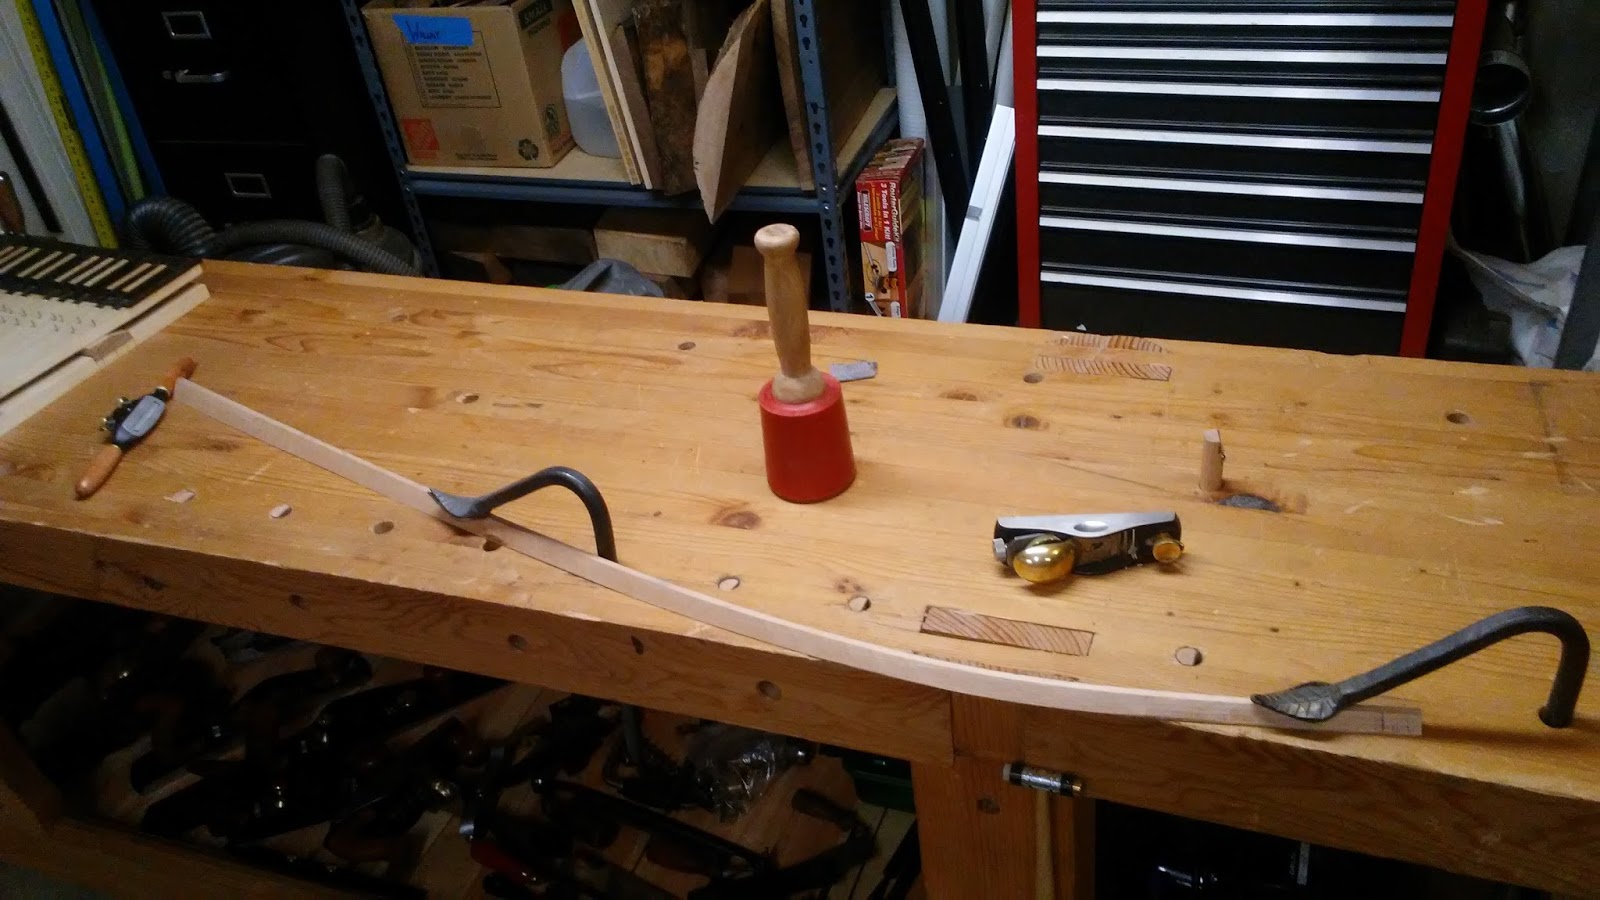
I've gotten quite a lot accomplished since my last post; unfortunately, most of it has been related to climbing the learning curve on some CAD/CAM design software I'll be presenting in the next few weeks. In the meantime, I ended up finishing the eight foot bridge. I did not use a band saw, which I know would have been quicker, but I really did enjoy the process I chose: Drawknife and spokeshave work. Initially, I started with the spokeshave.


I quickly realized I would need to take off more meat with every stroke, so I pulled out the Big Gun.


With a little support from Mssr. Roubo.


Things went swimmingly until...


I was done.


Just look at that hook.


While I found cherry much harder to work with than beech, I can see how it might help produce a more pleasant, ringing tone. The physics behind tonewoods and how they can amplify (or dampen!) the acoustical output of an instrument are well know, so I won't belabor them here. Suffice it to say, a wood that's more "plastic" without some brittleness (for lack of a better term) might not be the best choice for a soundboard. In this case, cherry is the better choice for the bridges.

While working on the eight-footer, I managed to also mostly complete the four foot hitchpin rail, just need to finish sanding the sides to even things up a bit.


This piece will be glued to the reverse as opposed to the obverse, which will get the bridges, of the soundboard, as will the cutoff bar and ribs. I'm preparing the blanks for those in the photos below and will continue to work on them throughout the week.


Until next time...

Tuesday, May 1, 2018

Day 172: Getting the Eight-Footer Locked Down

The four foot bridge has been steamed, bent, spokeshaved, and otherwise prepared for installation (still need to cut to length, but I'm not a detail guy). The eight foot is another matter entirely. When comparing it against the plan, the angle was not as acute as it needed to be. As I was testing it against the form, I heard a loud CRACK and you'll never guess what happened. Yep, this:


Just a scratch, right? So, it was back to the drawing, or steaming, board as it were. One thing I should call out is how to read wood. In this case, I had bent the thing with the flat sawn part of the piece on top. This created an akward bend that resulted in the break. Granted, I probably could have made it work, but I paid closer attention on the second bend and faced the quarter sawn side face up. Though I did this, I still didn't achieve the angle required by the plan, so it was back into the steamer and form. Again.


Only this time, I used the four foot part of the bending form because it would allow me to overbend the stick to account for springback, something that's pretty common when bending wood, especially material that's been kiln dried; it just wants to go back to its original shape when removed from the form.


As you can see, the bend is sharper. A little TOO sharp, perhaps?


Nope, it fit the plan spectacularly well. Time for a celebratory adult beverage. Oh, wait, what's that? Why, it's a pitch pocket in the worst possible location.


Given the fact this side will get a small bevel, I knew I would be spokeshaving most, if not all, of the pocket away, but decided to check with master builder Owen Daly just to be sure. Fortunately, Owen said it's not a show-stopper and that there are a couple of ways to handle it if and when necessary. Based on this information, two things then occurred: 1) Happy dance and 2) Preparation for tacking on the bass hook I had cut a little earlier.


I taped the pieces together, drew a slanted line, and cut them on the band saw. When I checked the joint, it was good enough for government work, so I glued it up.


And now we wait until tomorrow to trim things down. In the meantime, I turn my attention to the four foot hitchpin rail that will be mounted to the underside of the soundboard. This one is made from poplar and will be cut to size - no bending involved (thank the Good Lord Above).

Until next time...

Thursday, April 26, 2018

Day 171: From Beech to Cherry, the Bridge Saga Continues

After completely destroying the last set of bridges on the band saw and with the spokeshave, I had a short conversation with Kevin Spindler, a builder who resides on the East Coast. We talked about materials and techniques and he reminded me how the Old Guys used cherry for their bridges and that he had used it for an eight foot bridge and he was quite happy with the tonal result. Rather than split the new ones between beech and cherry, I just used cherry for both.

But first, let me explain how I ruined the last ones. When I was cutting them on the band saw, I had forgotten to reset the blade tension when I switched from a 3/8" to a newer, sharper 1/4" blade. This resulted in a blade that swam around in the wood, which is never a good thing. The outcome was particularly bad for the four foot and I ended up crossing a cut line and could not save the poor, little guy. I destroyed the eight foot by spokeshaving to the wrong cut line, resulting in a 1/8" top, rather than 1/4".

Both of these mistakes speak to preparation and careful consideration before engaging in anything in the shop. In the case of the band saw blade, it was thoroughness that got me. The spokeshaving came about during a lunch break in which I dove in with abandon without first triple-checking my cut. Granted, it happens, but both of these instances were preventable with a little more preparation and circumspection. You gotta have goals, right?

The good news is that I'm now pretty good at making bridges - at least the cutting to length/width/height, steaming and bending parts. I've grown to love the steaming process. It takes time and patience, both of which I have in minute quantities, so it teaches me to relax into the process every time I steam something. And it's fun to bend wood, so there you go.

The first step to getting the bridges into shape is to cut the planks down to length and width. I don't have a setup that will immediately accommodate cutting long boards to length. Well, not without hauling out the chop saw and setting it up. In this case, it was much easier for me to pull out the new Japanese rip/crosscut (Ryoba) saw and get to work.


Then, I cleaned up the plank sides using the new Veritas jointer plane.


It's really nice when a plan comes together. My intent with the new plane and saw purchases was to use more hand tools, less electricity. In this case, it worked.

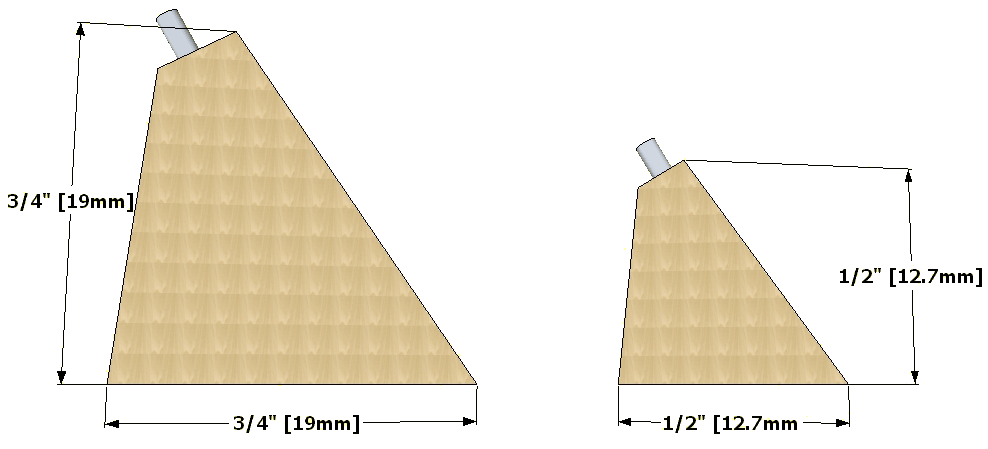
Then, I carpet-taped the cherry board to a guide plank and cut the bridges to the required widths/angles. The eight foot runs from 3/4" to 1/2" over 55" and the four footer runs 1/2" to 1/4" over 43".


Into the steambox they went.


And then onto the bending form.


It seems like deja vu all over again, doesn't it? Rather than subject them both to the band saw when they come off the form, I'll be spokeshaving their bevels. I just feel more comfortable doing it this way and the new Veritas spokeshave works through wood like a hot knife through butta.

On a tangentially related note, I recently acquired a miniature Veritas spokeshave that I'll use to bevel the bridges on their high sides (or the bevels facing the player). These bevels will be the platforms for string guide pins and I'll shave them down using the little fella below after I've glued the bridges to the soundboard.


As I said on the Book of the Face, the spokeshave had a wee, little baby. It's tiny, but it's razor-sharp and will work perfectly for its intended use.

Until next time...

Wednesday, March 28, 2018

Day 170: Bending, Rebending and Joining

The bridge saga continues. After I had recut and rebent the 8' and 4' bridges and matched them up to the plans, I realized they would need another steaming session. I finally ended up with a nice Owen-approved curve, but not until steaming and bending them twice. I've been told woods will not take to bending once they've been bent because something magical (which always goes unspecified) happens to the lignin (the complex organic polymer in all woods) once it's been heated and bent. I can say with complete confidence that this is untrue. So, I bent the bridges twice until I got the curves I felt I deserved.


I shot Owen a quick email with the last photo above and he responded with encouragement, so I decided it was time to get the hook tacked onto the bass end of the 8-footer. I went with a half-lap joint because I've used them with some success in the past. Rather than scrape and spokeshave the hook to death, I used the Ridgid oscillating spindle sander to smooth the band saw cut marks down in record time.


I then cut the lap joints on the table and band saws and took to gluing it up late last night.


I should have a stable joint in the next couple of days. Then, I'll cut the bevels (on the correct side this time) and, as Owen would say, "Bob's your uncle." I really have no idea what that means, but it sounds really cool.

Until next time...

Wednesday, March 21, 2018

Day 169: Bridge Bevel Bonanza

UPDATE: Owen just told me I cut the bevels on the wrong side. This was based on the image below in Mr. Miller's eBook Most Excellent that I've surmised illustrates the nuts, not the bridges. Sure, it's a little frustrating, but what the heck, practice is good. Back to the drawing board - literally. Besides, it gives me the chance to tack the hook onto the 8' before cutting the bevel.

Image from The Harpsichord Project E-Book 4.0 by Ernest Miller.

As you know from previous posts, I've been preparing to cut the bevels into the bridges for some time now. Frankly, I was scared sheetless to do it because I couldn't bear the thought of ruining another set, but, hey, it's all good, right? Fortunately, I attended a Western Early Keyboard Association (WEKA) event recently and was able to get a good look at some example instrument bridges. Owen Daly was in attendance and was kind enough to give a short clinic on making bridges, which also helped enormously.

I took photos of the instrument at the event, but it turns out they're not very illustrative. The rub for me in cutting the bridges was related to how wide the top of them should be. While Owen was telling me they should be a consistent size (pretty thin) from the larger to the smaller ends, Mr. Miller's eBook Most Excellent describes a top thickness that is variable from end to end. After viewing the instrument at the WEKA recital, I realized they could (should?) be the same width from one end to the other - no disrespect to Mr. Miller whatsoever. And, as Owen said at the WEKA event, "The bevel angle should be determined by the width of the top of the bridge before the outside bevel is introduced, not by an arbitrary degree measurement."

I know this may all be a bit abstract. At the end of the day, Flemish instrument bridges end up being weird variable trapezoids that change in size from one end to the other. The 8' bridge is 3/4" at one end and 1/2" at the other and the 4' is 1/2" to 1/4". I'll be illustrating in greater depth how they work in subsequent posts - it's really too much to fully explain here. Suffice it to say the bridges act as terminal resonance points for the strings between them and the nuts - just like on a guitar. On both instruments, the termination points of the strings (i.e., where they are secured to the instrument) are less important than the location of the nuts and bridges because the distance between those points determine the notes played by the strings.

Whew. Just a second, I need to catch my breath. Okay...we're back. Now, Mr. Miller has devised an ingenious way to cut the bevels into the bridges BEFORE BENDING them. Owen, on the other hand, cautioned me against this approach due to the potential for twisting post-bend. As always, I was willing to give Owen's recommendation(s) a shot and went ahead with the cutting, steaming, and bending of both bridges.

As you may recall, I tried bending the bridges using the bentside form. Not a good plan. This time, I made the 8' bending form, steamed the bridge, got it onto the form for a couple of days, and, viola! - it actually worked. A nice, curvy, uniform bend with little springback was the result.


I was so pleased with the result that I forged ahead with setting up a 4' curve on the same form and got the 4' bridge steamed and bent.


Now, this is where I took a pretty substantial break for fear of screwing up (again). Once I gathered up the requisite fortitude, I went ahead and set the band saw at 30 degrees and ran a test cut.


When I compared the test against the "old" bridges, it was a nearly perfect match, so I went ahead and cut the 8' bridge bevel.


The next step was to clean up the band saw marks. I initially used a spokeshave, but found it to be a bit rough, especially since I had not honed the blade after purchasing it. In the interest of expediency, I switched to the Lie-Nielsen low angle block plane, which made quick work of the cleanup.


I was so pleased with the result, I moved on to cleaning up the 4' bridge, yet I found that a little ebony luthier's plane worked best on that one. The added benefit was that the ebony burnished the wood as I planed it down, resulting in no need to scrap or sand.


Still, there remains the matter of adding the hook to the bass end of the 8' bridge. This part of the bridge curves at too sharp an angle to bend on the form, so we just cut one to angle and tack it onto the bridge at just the right place. In the photos below, I'm tracing it out and preparing to cut it, but, alas, it got too late and I didn't want to suffer from spousecide (she goes to bed much earlier than I).


On a couple of completely unrelated notes, I am now and probably always will be a sucker for swag.


I'll most likely order a few, but with our tag line "Tardus et stabilis..." (Latin for "Slow and steady...") and the web address. The quality of the pen is pretty high, which is nice.

I also got the dust boot installed onto the CNC machine, which is the culmination of an interesting story. When I picked up the machine after driving to Waldport, Oregon from Vancouver, Washington - about a 4 hour trip each way - I asked Cool Craigslist Guy about the dust collection he advertised on the CL ad. He said, "Oh, yeah, here it is," and handed me a Dust Deputy funnel and sawdust bin. I thought, "Well, okay, I guess I'm saving enough it doesn't really matter."

A couple of days later, I received an email from him saying he forgot to give me the Suckit Dust Boot (you know, the dust collection he advertised on CL) and that he would be shipping it to me post haste. All good, right? Well, when I got it, I discovered so many parts were missing it rendered the boot unusable. So, I contacted the Suckit people to see if I could purchase the missing parts. The wonderful person there said, "We love the fact you purchased it on Craigslist. If you send me a photo of what you have, I can send you what's missing."

After emailing Jenn a photo, she let me know they'd be replacing the missing parts and shipping them to me free of charge. Holy cow, I was flabbergasted. In a consumeristic society like ours in which everything has a price, a company exists that cares more about customer satisfaction than making a buck. My hat's off to the Suckit people - you rock.


The assembly was made easier by following a video on their website and I now have a CNC machine that looks an awful lot like an elephant. If it keeps the shop largely free of CNC-created sawdust, I'll take it.

Until next time...

Tuesday, March 13, 2018

Day 168: Bridges, Bridges, Bridges

As much as I wanted to shoehorn the bridges bent on the side lamination form into the proper angles, they just were not acceptable. Owen Daly could tell from the photos I posted here and on Facebook that they were not okay and it was at his adamant encouragement that I embarked on a rebending exercise for the 8' bridge (the 4' will be next, but only if this works), only this time using a form I made on the original sheet of plywood I used for the first failed iteration (yes, I'm on Bridge Adventure #3).


As you can see, I ordered a dozen spring clamps and waited a week for them to arrive before embarking on the bending session. This time, I also steamed the bridge using my custom setup, rather than soak it overnight.


We use only the highest of tech here at Tortuga Early Instruments Worldwide Headquarters.

I steamed the 8' bridge and got it into the form using clamps I already had - they clamped tighter and held better. I ended up using only a couple of the spring clamps, but I'm sure I'll find a use for them from time to time.


The bridge currently sits in the form. I'll remove it toward the end of the week to see what we have to work with. I'm also waffling about running them on the band saw. I have a razor sharp drawknife and that beautiful new Veritas spokeshave - they should both make quick work of beveling should they not?

Speaking of Veritas, I made a management decision a couple of weeks ago. I decided that jointing anything in the shop will be done by hand moving forward. This meant I needed to dispose of the Delta 4" knuckle-shaver and convert all jointing activies to using hand planes. Cool Craigslist Guy purchased the jointer the first day I listed it.


The empty space is where it once stood. So much more room for activities. It was replaced with a Veritas low-angle/bevel-up jointer hand plane. While I was at it, I decided to go ahead and pick up their low-angle/bevel-up smoother, as well. The default blades for both of these planes are a 38-degree beauty. I'm not going to get into a discussion about the merits of bevel-up vs. "regular" planes here. There are plenty of other fruitful places to argue which is better/worse. I prefer bevel up. Period.

I will say, though, that on bevel-up planes, specific angles accomplish specific tasks such as hogging out more wood with a minimum of tearout or nearly emulating a scraper. In this case, the 38-degree blade combined with the 12-degree bed provides the basic 50-degree York cut that so many favor for smoothing. Since the 2 1/4" width blades are interchangeable between the planes, I also picked up 25-degree and 50-degree blades. There are many subtleties associated with using low-angle/bevel-up planes, including how microbevels are honed, etc., but, again, this ain't the place.

So, we welcome these two new team members to Tortuga Early Instruments.


The gadget at the bottom of the photo above is a jointer fence what will allow me to joint vertically, rather than setting up, say, an 8' horizontal shooting board, using the Roubo bench leg vise while not introducing unintended bevel into the process. If you've ever tried to freehand a joint, you'll know what I mean. Like the planes, the fence has a tiny, little set screw to keep things lined up and accurate. I also had a cleaning session to get the shipping/preservative goo off of the team members.


A little mineral spirits followed up with a some Boeshield T-9 (I silently thank Random Roger Green for introducing me to the stuff everytime I use it) will keep these fellas in good working order for many years to come. Who knows, I may even sell the Lie-Nielsen No. 62 and go with a Veritas low-angle jack, we'll see (John - that Lie-Nielsen large scraper is staying with me, sorry).

Until next time...