While speaking with Owen Daly of Owen Daly Early Keyboard Instruments about lower and upper bracing, Owen mentioned to me that he found the upper bracing scheme in Mr. Miller's eBook Most Excellent to be a bit on the heavy side. While I in no way question Mr. Miller's motivations for his directions or reasons for giving them, I decided to pause for a couple of weeks to look at drawings and photos of Ruckers instruments. Paul Irvin, a builder with over 200 instruments under his belt, was also instrumental (pun intended) in introducing me to drawings and ideas from different builders and their national traditions.
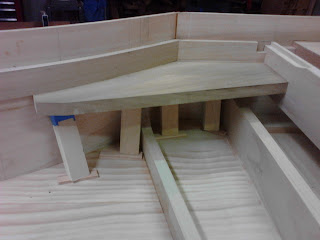
Sometime last year, I attended a Western Early Keyboard Association performance in which the instrument being used had some "cheek curl." I've since come to learn that this can be quite common in harpsichords due to string tension and that it is also quite preventable. One thing Owen recommended was to put a brace into the area where the bentside meets the cheek. Thus I have dubbed it the Cheeky Brace. Owen says this structure will prevent cheek curl, so I proceeded with this idea by cutting and installing one in the instrument earlier today.
First, I started with a new piece of 3/4" poplar. I purchased the darkest material I could find because it has been my experience that dark poplar is quite hard. Whether it's heartwood or not is neither here nor there. I simply know it's good and hard and what I wanted to use for the Cheeky Brace. Interestingly, I found a piece that was nicely figured, which I had never before seen in poplar.
I took some measurements in the bentside/cheek joint corner and cut a piece to fit snugly under the cheek and bentside liners. I also cleaned it up quite a bit using a No. 7, a No. 4, and a small block plane.
It was so nice to put the Roubo to work; its leg vise performed flawlessly. Once I had the piece into shape, I assembled the glue-up parts and did a little planning.
Because I had mounted the case to the bottom earlier, I was forced into making small blocks that I could pound in as wedge clamps between the bottom of the Cheeky Brace and the bottom of the instrument - another reason to hold off on gluing the sides to the bottom until a little later in the game. You can see where I covered the business ends of the wedges with painter's tape to prevent them from becoming permanent parts of the instrument (plastic glues won't stick to painter's tape).
I gingerly tapped them into place and they are setting up in the shop as I write this. The final photo I'll share below is the space between the flat spot on the end of the Cheeky Brace and the spine that will be filled in tomorrow with a nice upper brace (the Cheeky Brace is in the bottom of the photo).
I'm excited to get these braces into place, as well as an "upper belly rail stiffener," so I can move on to making the registers and, I hope soon, the jacks.
Until next time...


No comments:
Post a Comment